Tuesday, November 11, 2008

Success... Kind of...


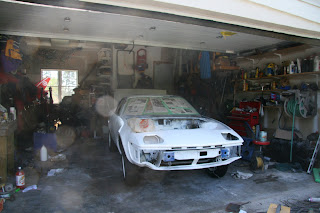
I started the car today. For safety's sake, I moved my wife's car from in front of the garage, and opened the door before attempting to start. Pretty good thing I did too, as forward was fine, but 30 seconds in, the controller exploded, jammed the car full speed in reverse (thankfully I had put it in reverse moments before) and, tires screeching, slammed the car into the rear of the garage, destroying two garbage cans, poking a nice hole in the wall, and annihilating a wooden rack containing among other things about 40 pounds of nicely sorted nuts and bolts. These promptly went into the back of the car with a huge crash. The circuit breaker tripped and stopped the 10 seconds of madness. The good news is it all works! Now to start putting it back together again while I wait for the new controller...


Thursday, October 30, 2008

Wiring

The main wiring is almost finished - all the small pieces are in place and the two main runs are in place - just not tied down yet. It should be movable by the weekend!

Wednesday, October 15, 2008

Vacuum System

I boxed up the pump today - I stuffed the box with insulation to dampen the noise, and the pump sits on rubber feet as well. Hopefully it'll be very unobtrusive. The vacuum cutoff is in and wired as well. I put it close to the pump, hanging off one of the battery boxes. It's large, so finding a spot was tricky. The vacuum check valve runs underneath the accessory box to connect to the reservoir by the firewall.


Wiring to the pump cutoff switch


The pump is in place, the cutoff switch is in place, the ground wires are in, the accessory battery is in. The little red key in the lower right corner of the top box is a main battery cutoff switch.

The console back in - it still looks like vikings have been at the cockpit, but it'll snap together soon... I hope...

Saturday, October 11, 2008

It's Alive!

I spun it today for the first time. Two bad sets of jumper cables made it a much harder job than anticipated. Forgetting that I had hooked up the driveshaft and left it in gear would have been really exciting if I hadn't just been using a single 12v battery. Running myself over is an old Monty Python skit; wouldn't want to explain that to the Paramedics...

I installed the inertia switch as well today - this will shut the motor down, killing power to the pack in the event of a major collision.

Friday, October 3, 2008

The Instrument Console

Done. Six hours, but it's done.
It looks pretty much like it was always supposed to have a voltmeter and ammeter, which was the whole point, of course!


The cluster getting prepped for the hacking

After the hole saw


Done!
The old fuel gauge is now the voltmeter, which give me battery life; the temperature gauge is now the ammeter which tells me how hard I'm being on the batteries.

Monday, September 29, 2008

Batteries, Round 2

I put the batteries back into their newly insulated boxes - I have decided to wrap them in plastic, then seal 'em up using expanding foam insulation. That will help anchor everything, and will provide the maximum heat transfer and insulation for the batteries... The component box is done - it's not pretty, but it's functional.


Four batteries are up under the front of the car, one are down each side of the motor.

Tuesday, September 23, 2008

More and more...

I've had to spend some time figuring out how to keep the batteries warm, as the weather is cooling down and I'm expcting to use this car for as many months as possible. To that end, I've insulated the boxes with industrial carpet and rubber, followed by a heating pad with a .050 piece of aluminum on top. Hopefully, when the boxes are sealed up, I should be able to keep about 15-20 additional degrees in the batteries.

The vacuum system is also coming along after a few delays. I should be installing it shortly...

Monday, August 11, 2008

Heater

It's in. The easy part was wiring the new ceramic core and making a plate for it to sit in... The hard part was replacing all the rotted foam in the poor old thing. It looked/felt like it had been doused in gas - all the foam would come apart at the slightest touch.
I replaced all the foam with adhesive backed foam strips used to hold truck caps down with. Perhaps not going to pass concours, but good enough for me.


The new heater core


My sketchy re-foaming. The whole unit had to come apart to get the inner vents...


Back in place. The dash will be in tonight, and then I'll get the instrument cluster re-wired for my ammeter and voltmeter.

Thursday, August 7, 2008

Back From Camping

So many components showed up while I was gone...
Vacuum Pump, Potbox, Circuit Breaker, Fuses, Gauges, Shunt, Battery Pads, Heater Core...
I don't know where to begin, so I'm first going to build the box to put it all in...!

Sunday, July 27, 2008

Getting ready for the heater


In preparation for the heater showing up this week before I go away, I have the dash out and the heater box broken open. Once I get the new core, I can determine the best way to mount it...

Wednesday, July 23, 2008

Final Battery Box is in...


Front battery box is now in. After loading the boxes up, however, I noticed the front is too high. I'll probably need to shorten the springs...

Saturday, July 19, 2008

Rear diff is full, driveshaft is in place

Filled up the rear differential - no oil at all left in it after a 20 year hiatus...
The driveshaft is in - now all I have to do is get the controller, etc. hooked up...

Friday, July 18, 2008

Engine Is In and Tied Down!


Good news for me! The new motor sits nicely on the old 4 cylinder front engine mount, and a few pieces of heavy sheet metal finishes it off... 4 hours to get it in there, though...

Thursday, July 17, 2008

Engine and Tranny installation, Part 1


Why, oh why didn't i do this BEFORE I lowered the car?!


The Engine and tranny are now in place- the engine is braced for now, but the transmission mounts are all in place...

Saturday, July 12, 2008

Assembly


With my transmission reassembled, and all the rest of the parts in place, I merely had to spend 4 painful, nerve-wracking, swear-filled hours assembling the adapter plates and trying desperately to get the input shaft to line up. Eventually it did, but wow...

Wednesday, June 25, 2008

Coming Down, Part 2

After bringing down the rear, disaster struck in the form a a completely destroyed transmission. Upon opening it for a look, I found third gear was worn down almost completely smooth. I can't even imagine the incredible noise that would have made while it was happening, so I can't imagine how it got to this state. My only saving grace was the wreck I gutted last year. I thought its tranny was destroyed as water (!) poured out of it instead of oil when I opened it up, but after a look it's almost completely pristine! A few parts were rusted, but conveniently they were spared destruction in the original transmission, and after a bit of swapping, I have my transmission!


The secondary delay between the rear coming down and the front has been the appalling state of the garage. After numerous hours cleaning, it now just looks horrible, but more importantly, I can lower the car safely.


Riding high without the motor.

Monday, June 16, 2008

Coming Down...


New shocks - front and rear, new rotors, new pads, new rubbers, new lines, and I promptly blow a caliper. Ah well - it's coming down regardless. A replacement kit is already on order.

Wednesday, June 11, 2008

The Transmission Adapter


I decided to use the existing tranny and clutch as the poor thing's too old for me to trust its clutchless-shifting capability. The adapter plates were measured off of a spare bellhousing, mapped in DeltaCAD and cut on a plasma cutter at Cruickshanks Sheet Metal. The owners are great people who are always willing to lend a hand to a fool like me.


Flywheel's on.

Tuesday, June 3, 2008

Tires are on


Instead of trying to figure out the best Low Rolling Resistance tire I can find, I simply went to Wal-Mart and got a standard set of touring all-seasons. A few less km's in range, but safer in bad weather.

Wednesday, May 21, 2008

Wheels Are Painted


They're a tiny bit rough, but if someone complains about my rims while lying on the ground (only way to really see the roughness), I'll simply kick 'em in the crotch.

The Flywheel


The flywheel came back to me at 9.5 pounds - just what I wanted! There's still lots of thickness as well to keep it from warping if I decide to actually race it... (yeah, sure)

Wednesday, May 7, 2008

A Little Help


As her older sister used to beat on my TR7v8 with a wrench during my rebuild, my little one helps with a screwdriver. Good news for me is - the car's too high for her to reach!

Sunday, April 27, 2008

The Motor


I finally took my Warp 9 out of its box today. 160 pounds. I'm shaving the end off an old TR7 crank to get the adapter for the flywheel, and Halifax Engine is going to lighten the flywheel for me. I'm expecting to get it down to 9-10 pounds with a little luck. Losing all that rotational mass will improve the efficiency of the car quite a bit, I'm told... The clutch looks good except the plate is split. I'll buy a new one.


Thursday, April 24, 2008

Wheels


I'm taking a break and refinishing the special (ugly as hell) Victory Edition wheels. They're rusted half to death and the tires are long gone... but it's gotta be done.


Sunday, April 20, 2008

Rebuilding

In the mid to late 1970's, British Leyland was hit by a number of prolonged work stoppages. The end result of this was a series of cars that wouldbe half finished, then left for months in their damp climate before being painted. I feel this car is a shining example of this.


A little bit of work yet to go, but it's a start..


Lots and lots of rust and dents...


Rebuilding the floor pan


Coming back together


Getting closer

Monday, February 25, 2008

So Much Rust...


Way, way more rust than I previously thought... Lots of work to do...


Learning to weld...


Surprise! Even more rust.


Gotta fix this before I set the battery box in there... *sigh*